Removing the Lower Crankcase from the 3.0L Engine
Joe Angell
Removing the 3.0L's lower crankcase is pretty much identical to removing the one from the 2.8L. In the interest of completeness, I've documented it here as well.
Flipping the Engine
Having previously pulled the engine, removed the main pulley and the timing and valve covers, I now had to flip the engine over. The engine was sitting on the stand, so I just had to pull the pin and rotate it around.
The engine had been drained before it was shipped to me, but I still expected some oil and coolant to be in it. I was not disappointed. I put an oil pan underneath, but still managed to get a lot of it on the floor. Some of my previously-purchased absorbent material helped clean that up. While I was waiting for the oil to drain, I discovered that there wasn't quite as much friction holding the engine at the odd angle as I thought -- it slowly started to rotate to its upside down position. I wasn't close to the engine, so I couldn't stop it, but it settled without any harm done, other than spilling a bit more oil around. With the engine inverted, I put the pin back in the stand to keep it from rotating any further and got ready to disassemble it.
Flipping over the 3.0L engine, and pouring the oil inside all over the floor.
Leave the Exhaust Manifolds (for now)
I would recommend against removing the exhaust manifolds until the lower crankcase is replaced. This ensures that debris doesn't enter the cylinder heads when the lower crankcase comes off, which usually requires a tap that dislodges debris that's trapped where the engine sits on the engine mounts. I found this out the hard way when disassembly the 2.8L engine.
Removing the Oil Pan
Like the 2.8L engine, the oil pan is held onto the lower crankcase with twenty two (22) bolts, which can be removed with an 11mm socket. I used a socket wrench to loosen the bolts, and a socket adaptor one a power drill to remove them completely.
My oil pan lifted off pretty easily once the bolts were out, with just some gently prying from one corner. Sometimes they can get pretty stuck and will need to be nudge off with a tap of a hammer against a block of wood to break it free. The pan was pretty clean, although it didn't really matter much since I wouldn't be using it anyway.
An 11mm socket can be used to remove the twenty two (22) bolts (green dots) holding the oil pan to the lower crankcase.
Lightly prying off the oil pan from the corner.
Removing The Oil Pump Inlet Tube
The oil pump inlet tube sits at the bottom of the engine, and is how oil gets from the oil pan to everywhere else. It is held in place with four (4) bolts -- one more than the 2.8L inlet tube -- which are removed with a 11mm socket.
One of the bolts has a spacer under it, while the other two bolts fit into an oblong piece with a tube in it. While the latter come out in my 2.8L engine, it seemed to be firmly mounted to the block in the 3.0L This piece also has an O-ring seal, which the 3.0L manual says should be replaced before re-assembly.
Since everything was covered with oil, I wrapped the inlet in shop rags before setting it aside.
The oil pump inlet tube is held in place with four bolts.
The oil baffle under the inlet pipe. The oblong piece on the lower-left corner of the image has an O-ring that should be replaced before re-assembly.
Removing The Oil Baffle
The oil baffle is just a large plate between the oil pan and the lower crankcase. Ten (10) of the bolts come out with a 13mm socket, while the last bolt is removed with an 11mm socket. It easily lifted off of the lower crankcase. It's worth noting that only four of the ten bolts hold the oil baffle down; the remaining six bolts are the bearing mounting bolts, and they hold the lower crankcase to the block in combination with the main bearing nuts. They all have to come out, so I just removed them all at once
I cleaned as much oil off the baffle as I could, wrapped it shop rags and set it aside before moving on to the next task.

The green dots mark the bolts removed with a 13mm socket, while the bolt represented by the blot dot takes an 11mm socket.
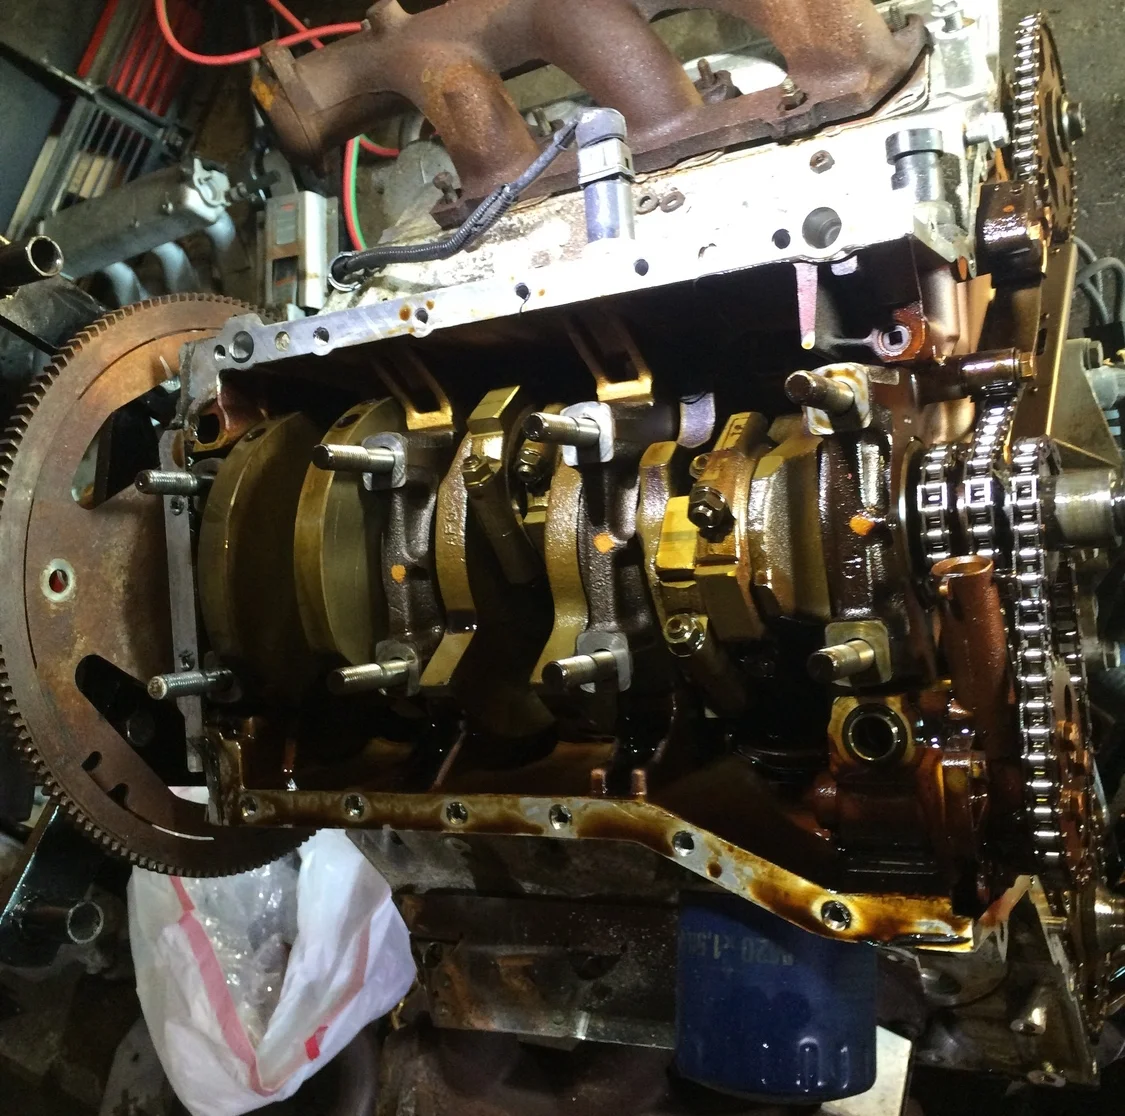
Removing the Lower Crankcase
The lower crankcase is held in place by eight (8) large nuts and four (4) smaller bolts, as well as the six (6) bolts that were removed with the oil baffle. A slightly complication is that the engine stand is attached to the lower crankcase at two points.
I was pretty sure the engine could be supported by only two of the mounting points, so I carefully unbolted and removed where the engine stand was attached to the lower crankcase. This worked just fine -- the engine stayed locked in place on the engine stand.
With that out of the way, I could remove the bolts and nuts. The bolts are in a rough line along the flywheel side of the engine, and are removed with an 11mm socket. Two bolts are used to secure the rear main seal assembly under the flywheel, while two longer ones are towards the outer edge of the block.
The eight nuts require a 22mm socket to remove, which I'd previously purchased when taking apart the 2.8L engine. All of them came off easily.
At this point I discovered that I forgot to remove a piece from the top of the engine. There is a tube that goes from the exhaust manifold to the lower crankcase. I'm not totally sure what this is for (there's no analog on the 2.8L engine, but it needs to come off before the lower crankcase can be removed. The pipe is connected to the top of the exhaust header with two bolts that can be removed with a 13mm socket. After that, the lower crankcase can finally be removed.
I had no problems removing the lower crankcase from the block; a upward light tap on a block of wood with a hammer easily dislodged it. In fact, I probably could have just lifted it right off. It did, however, drop a bunch of debris from the engine mounts, showing that it was a good thing that I'd left the exhaust headers in place to keep that from falling into the heads. I also was unable to pull out the dipstick tube; it was in quite tight, so I just left it where it was and snaked it through the exhaust mounts as I pulled the lower crankcase off.
The green dots mark the larger nuts that are removed with a 22mm socket, while the blue dots indicate bolts requiring an 11mm socket.
A pipe leading from the exhaust manifold to the lower crankcase needs to be unbolted.
Without the exhaust manifolds in place, I surely would have dropped debris into the cylinder heads while pulling off the lower crankcase.
With both engines disassembled, I now just have to wait for my 3.0L gasket set to arrive so that I can put everything back together.

